ubuntu配置
基本情况及参考
- ubuntu版本:ubuntu-22.04.3-desktop-amd64 LTS版
- 安装环境:虚拟机vmware 17.05
- 功能:主要为了学习ROS2,主力Linux系统为Archlinux(无界面)
安装后的配置
- 切换源:
- 备份:
cd /etc/apt/,cp souces.list souces.list_org - 清华源:Ubuntu 软件仓库镜像使用帮助
- 编辑:
sudo gedit /etc/apt/souces.list,将清华源帮助中的内容复制过来
- 备份:
- 升级更新
sudo apt-get updatesudo apt-get upgrade
- 安装open-vm-tools
sudo apt-get install open-vm-tools- 重启
sudo reboot
- 安装开发环境
sudo apt-get install build-essential
- 设置代理
-
虚拟机网络:使用NAT进行网络连接
-
根据各网卡IP地址分配设置ubuntu的静态IP为192.168.80.96
-
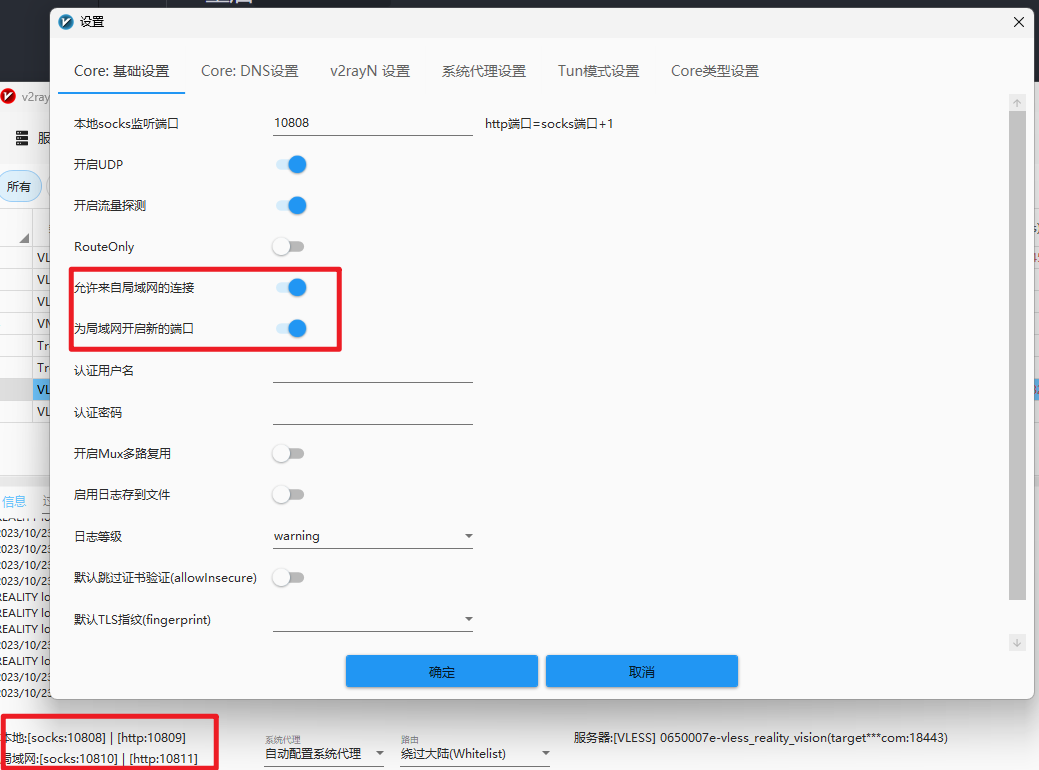
在windows下的v2rayN开启局域网连接
-
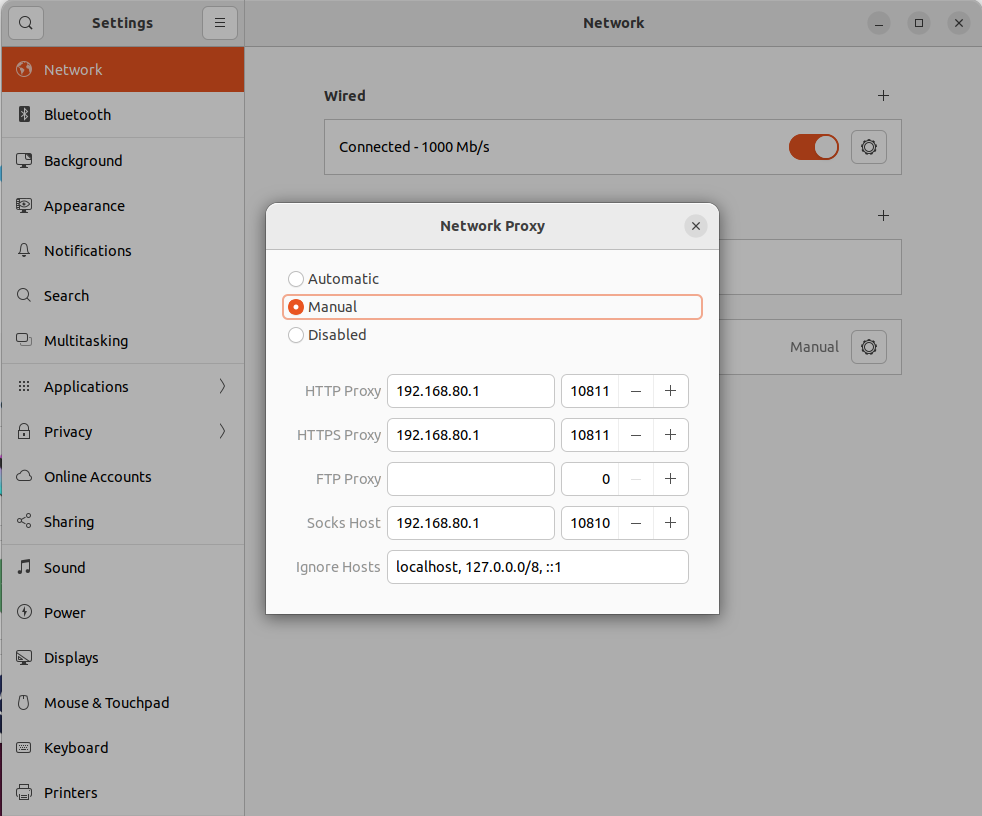
ubuntu中设置系统代理
-
- 开启SSHD:同Archlinux中的设置 SSH 免密连接
共享文件夹
vmware设置中开启共享文件夹后,在ubuntu中尚不能直接显示出来。需要进行挂载。
- 使用命令查看共享目录
vmware-hgfsclient - 创建挂载目录
sudo mkdir /mnt/hgfs - 查看用户ID,
id xiayu(xiayu为用户名) - 手动挂载
sudo vmhgfs-fuse .host:/ /mnt/hgfs -o uid=1000 -o gid=1000 -o allow_other
使用-o uid=1000 -o gid=1000指定所属用户和组,否则无访问权限
网上的说明中大部分没有uid/gid选项
- 查看是否挂载成功
mount - 开机自动挂载,在
/etc/fstab中添加一行.host:/ /mnt/hgfs fuse.vmhgfs-fuse uid=1000,gid=1000,allow_other,defaults 0 0
问题及解决
- 安装完成
open-vm-tools后不能与windows进行复制粘贴,需重新安装并保证服务开启。sudo apt-get autoremove open-vm-toolssudo apt-get autoremove open-vm-tools-desktopsudo apt-get install open-vm-toolssudo apt-get install open-vm-tools-desktopsudo systemctl enable open-vm-tools.servicesudo systemctl enable vmtoolsd.service- 重启
使用过程中的配置
ubuntu16.04网络配置
参考
设置静态IP
- 修改
/etc/network/interfaces,重启服务sudo service networking restart
# interfaces(5) file used by ifup(8) and ifdown(8)
auto lo
iface lo inet loopback

auto ens33
iface ens33 inet static
        address 192.168.1.94
        netmask 255.255.255.0
        gateway 192.169.1.1
        dns-nameserver 114.114.114.114

auto ens33:0
iface ens33:0 inet static
        address 192.168.0.94
        netmask 255.255.255.0
        gateway 192.169.0.1
        dns-nameserver 114.114.114.114

auto ens33:1
iface ens33:1 inet static
        address 192.168.10.94
        netmask 255.255.255.0
        gateway 192.169.10.1
        dns-nameserver 114.114.114.114
auto ens33:2
iface ens33:2 inet static
        address 192.168.43.94
        netmask 255.255.255.0
        gateway 192.169.43.1
        dns-nameserver 114.114.114.114
使用这种方法设置静态IP后无法使用图形界面来配置,如果要恢复界面配置,需重新开启NetworkManager服务。
修改/etc/NetworkManager/NetworkManager.conf,将managed = flase改为managed = true,之后重启服务sudo service network-manager restart。最好将/etc/network/interfaces内容恢复(移除ens33的所有配置)。